[스프링] REST API (3) - REST Docs (Self-Descriptive Message 구현)
Self-descriptive messages
- 메시지는 스스로를 설명해야 한다
- 에를들어 아래 메시지는 메시지 자체만 두고 봤을 때 어떻게 해석을 해야 하는지, 값들이 무엇을 의미하는지를 담지 않기 때문에 해당 조건을 만족하지 못함
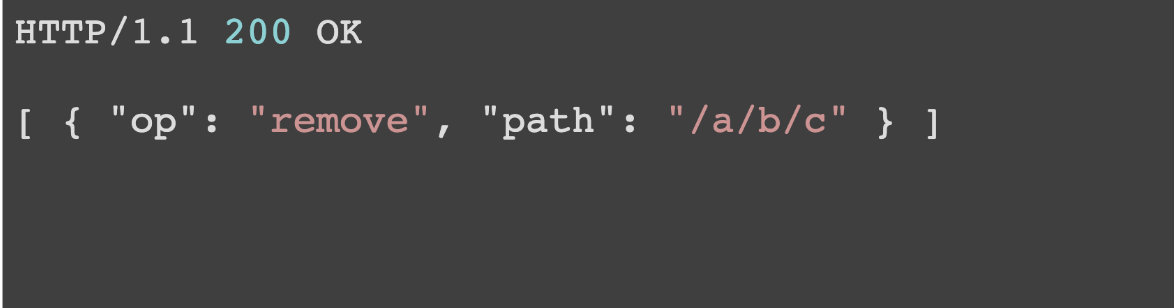
- 반대로 아래와 같이 추가를 해주면?
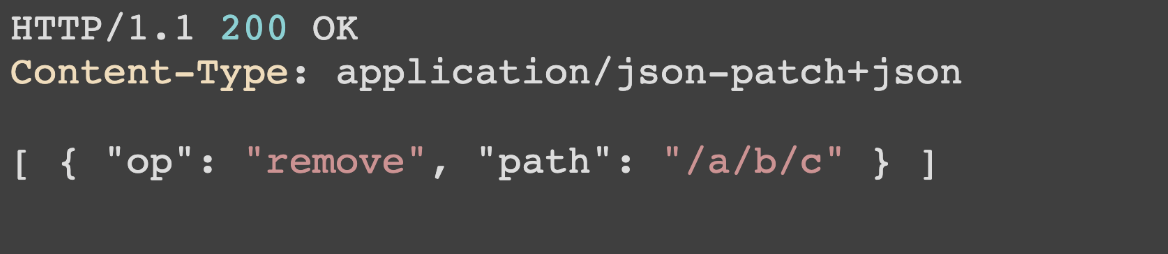
- Content-type을 보고 메시지가 JSON 형식임을 알 수 있고, json-patch라는 명세를 찾아가 메시지(json)을 해석하도록 해줌
- 확장 가능한 커뮤니케이션
- 서버나 클라이언트가 변경되더라도 오고가는 메시지는 언제나 self-descriptive 하므로 해석이 가능하다.
스프링 REST Docs?
https://docs.spring.io/spring-restdocs/docs/current/reference/html5/
스프링 MVC Test를 사용해서 API 문서 생성을 도와주는 라이브러리이다. MVC Test 시 사용한 요청과 응답을 이용하여 snippets을 만들 수 있다. snippets을 모아서 HTML로 생성이 가능하고, 이를 API Document로 사용이 가능하다.
REST Docs는 테스트를 통해 snippets을 만들어주는 역할이고, 이 snippets을 모아서 HTML로 생성해주는건 Asciidoctor가 수행한다.
의존성 추가
buildscript {
	dependencies {
		classpath 'org.asciidoctor:asciidoctor-gradle-plugin:1.5.9.2'
	}
}

plugins {
	id "org.asciidoctor.convert" version "1.5.3"
}

asciidoctor {
	doLast {
		copy {
			from file("build/asciidoc/html5")
			//src/docs/asciidoc 경로의 index.adoc 파일을 읽어서 생성된 index.html 파일 경로
			into file("src/main/resources/static/docs")
			//src/main/resources/static/docs에 위 index.html 파일을 복사한다.
		}
	}
	sourceDir = file('src/docs/asciidoc') // default path
	sources {
		include 'index.adoc'
	}
	//위의 경로에 있는 index.adoc을 읽는다.
	options doctype: 'book', backend: 'html'
}
build {
	dependsOn asciidoctor
}

dependencies {
  ...

	asciidoctor 'org.springframework.restdocs:spring-restdocs-asciidoctor:2.0.3.RELEASE'
	testCompile 'org.springframework.restdocs:spring-restdocs-mockmvc:2.0.3.RELEASE'
}
구현해보기
스프링 시큐리티에서 예외를 적용
@Override
public void configure(WebSecurity web) throws Exception {

    web.ignoring()
            .antMatchers("/docs/**");
}
회원가입 API 예시
@PostMapping("/signup")
public ResponseEntity signup(@RequestBody SignUpRequestDto signUpRequestDto) {
    Account account = accountService.createNewAccount(signUpRequestDto)
    SignUpResultDto signUpResultDto = modelMapper.map(account, SignUpResultDto.class);
    EntityModel<SignUpResultDto> entityModel = EntityModel.of(signUpResultDto);
    entityModel.add(WebMvcLinkBuilder.linkTo(RestAccountController.class).slash("signup").withSelfRel());
    entityModel.add(WebMvcLinkBuilder.linkTo(RestAccountController.class).slash("login").withRel("login"));
    // 다음 한 줄이 추가되어야 한다 - Self Descriptive 속성 만족을 위해 자기 자신에 대한 docs를 가리키는 링크를 추가
    entityModel.add(Link.of("/docs/index.html#user-signup").withRel("profile"));
    return ResponseEntity.created(uri).body(entityModel);
}
docs의 이름을 user-signup으로 정하고 위 코드의 주석 다음 줄 처럼 자기 자신을 가리키는 링크로 추가해준다.
REST Docs는 API Docs만 생성을 해줄 뿐, Self-Descriptive Message를 만족시키기 위해선 메시지가 해당 Docs의 링크를 포함하고 있어야 한다. 따라서 HATEOAS 우선적으로 구현해야 한다.
회원가입 테스트
    @DisplayName("회원가입 - 정상 입력")
    @Test
    void signupTest() throws Exception {
        /* given */
        SignUpRequestDto signUpRequestDto = SignUpRequestDto.builder()
                .nickname("blupine")
                .email("test@email.com")
                .password("asdfasdf")
                .build();

        /* when & then */
        mockMvc.perform(post("/api/signup")
                .contentType(MediaType.APPLICATION_JSON)
                .accept(MediaTypes.HAL_JSON)
                .content(objectMapper.writeValueAsString(signUpRequestDto)))
                .andExpect(status().isCreated())
                .andExpect(jsonPath("nickname").hasJsonPath())
                .andExpect(jsonPath("email").hasJsonPath())
                .andExpect(jsonPath("joinedAt").hasJsonPath())
                .andExpect(jsonPath("_links").hasJsonPath())
                .andExpect(jsonPath("_links.self").hasJsonPath())
                .andExpect(jsonPath("_links.login").hasJsonPath())
                .andExpect(jsonPath("_links.profile").hasJsonPath())
                .andDo(document("user-signup",  // 생성할 snippets 이름
                        links(
                                linkWithRel("self").description("link to self"),
                                linkWithRel("login").description("link to login"),
                                linkWithRel("profile").description("link to api docs")
                                ),
                        requestFields(
                                fieldWithPath("nickname").description("ID"),
                                fieldWithPath("email").description("Email"),
                                fieldWithPath("password").description("Password")
                        ),
                        responseFields(
                                fieldWithPath("nickname").description("ID"),
                                fieldWithPath("email").description("Email"),
                                fieldWithPath("emailVerified").description("Email verified?"),
                                fieldWithPath("emailCheckTokenGeneratedAt").description("Email verified time"),
                                fieldWithPath("joinedAt").description("Signup time"),
                                fieldWithPath("url").description("Profile URL"),
                                fieldWithPath("_links.self.href").description("self link"),
                                fieldWithPath("_links.login.href").description("login link"),
                                fieldWithPath("_links.profile.href").description("api docs link")
                        )));

        /* then */
        Account accountAfter = accountRepository.findByNickname("blupine");
        Assertions.assertNotNull(accountAfter);
    }
위에 API에서 추가해준 링크를 테스트 케이스에 모두 작성해준다. 이런 테스트 케이스가 성공적으로 실행이 완료되면 아래처럼 snippset이 build/generated-snippset 경로에 생성된다.
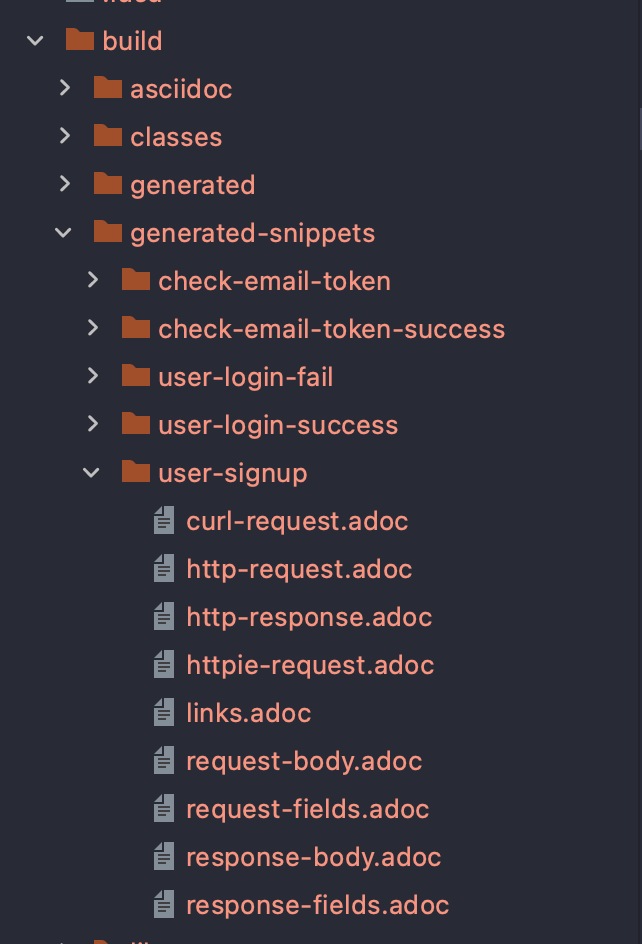
src/docs/asciidoc/index.adoc 파일
ifndef::snippets[]
:snippets: ../../../build/generated-snippets
endif::[]
= Natural REST API Guide
:doctype: book
:icons: font
:source-highlighter: highlightjs
:toc: left
:toclevels: 4
:sectlinks:
:operation-curl-request-title: Example request
:operation-http-response-title: Example response
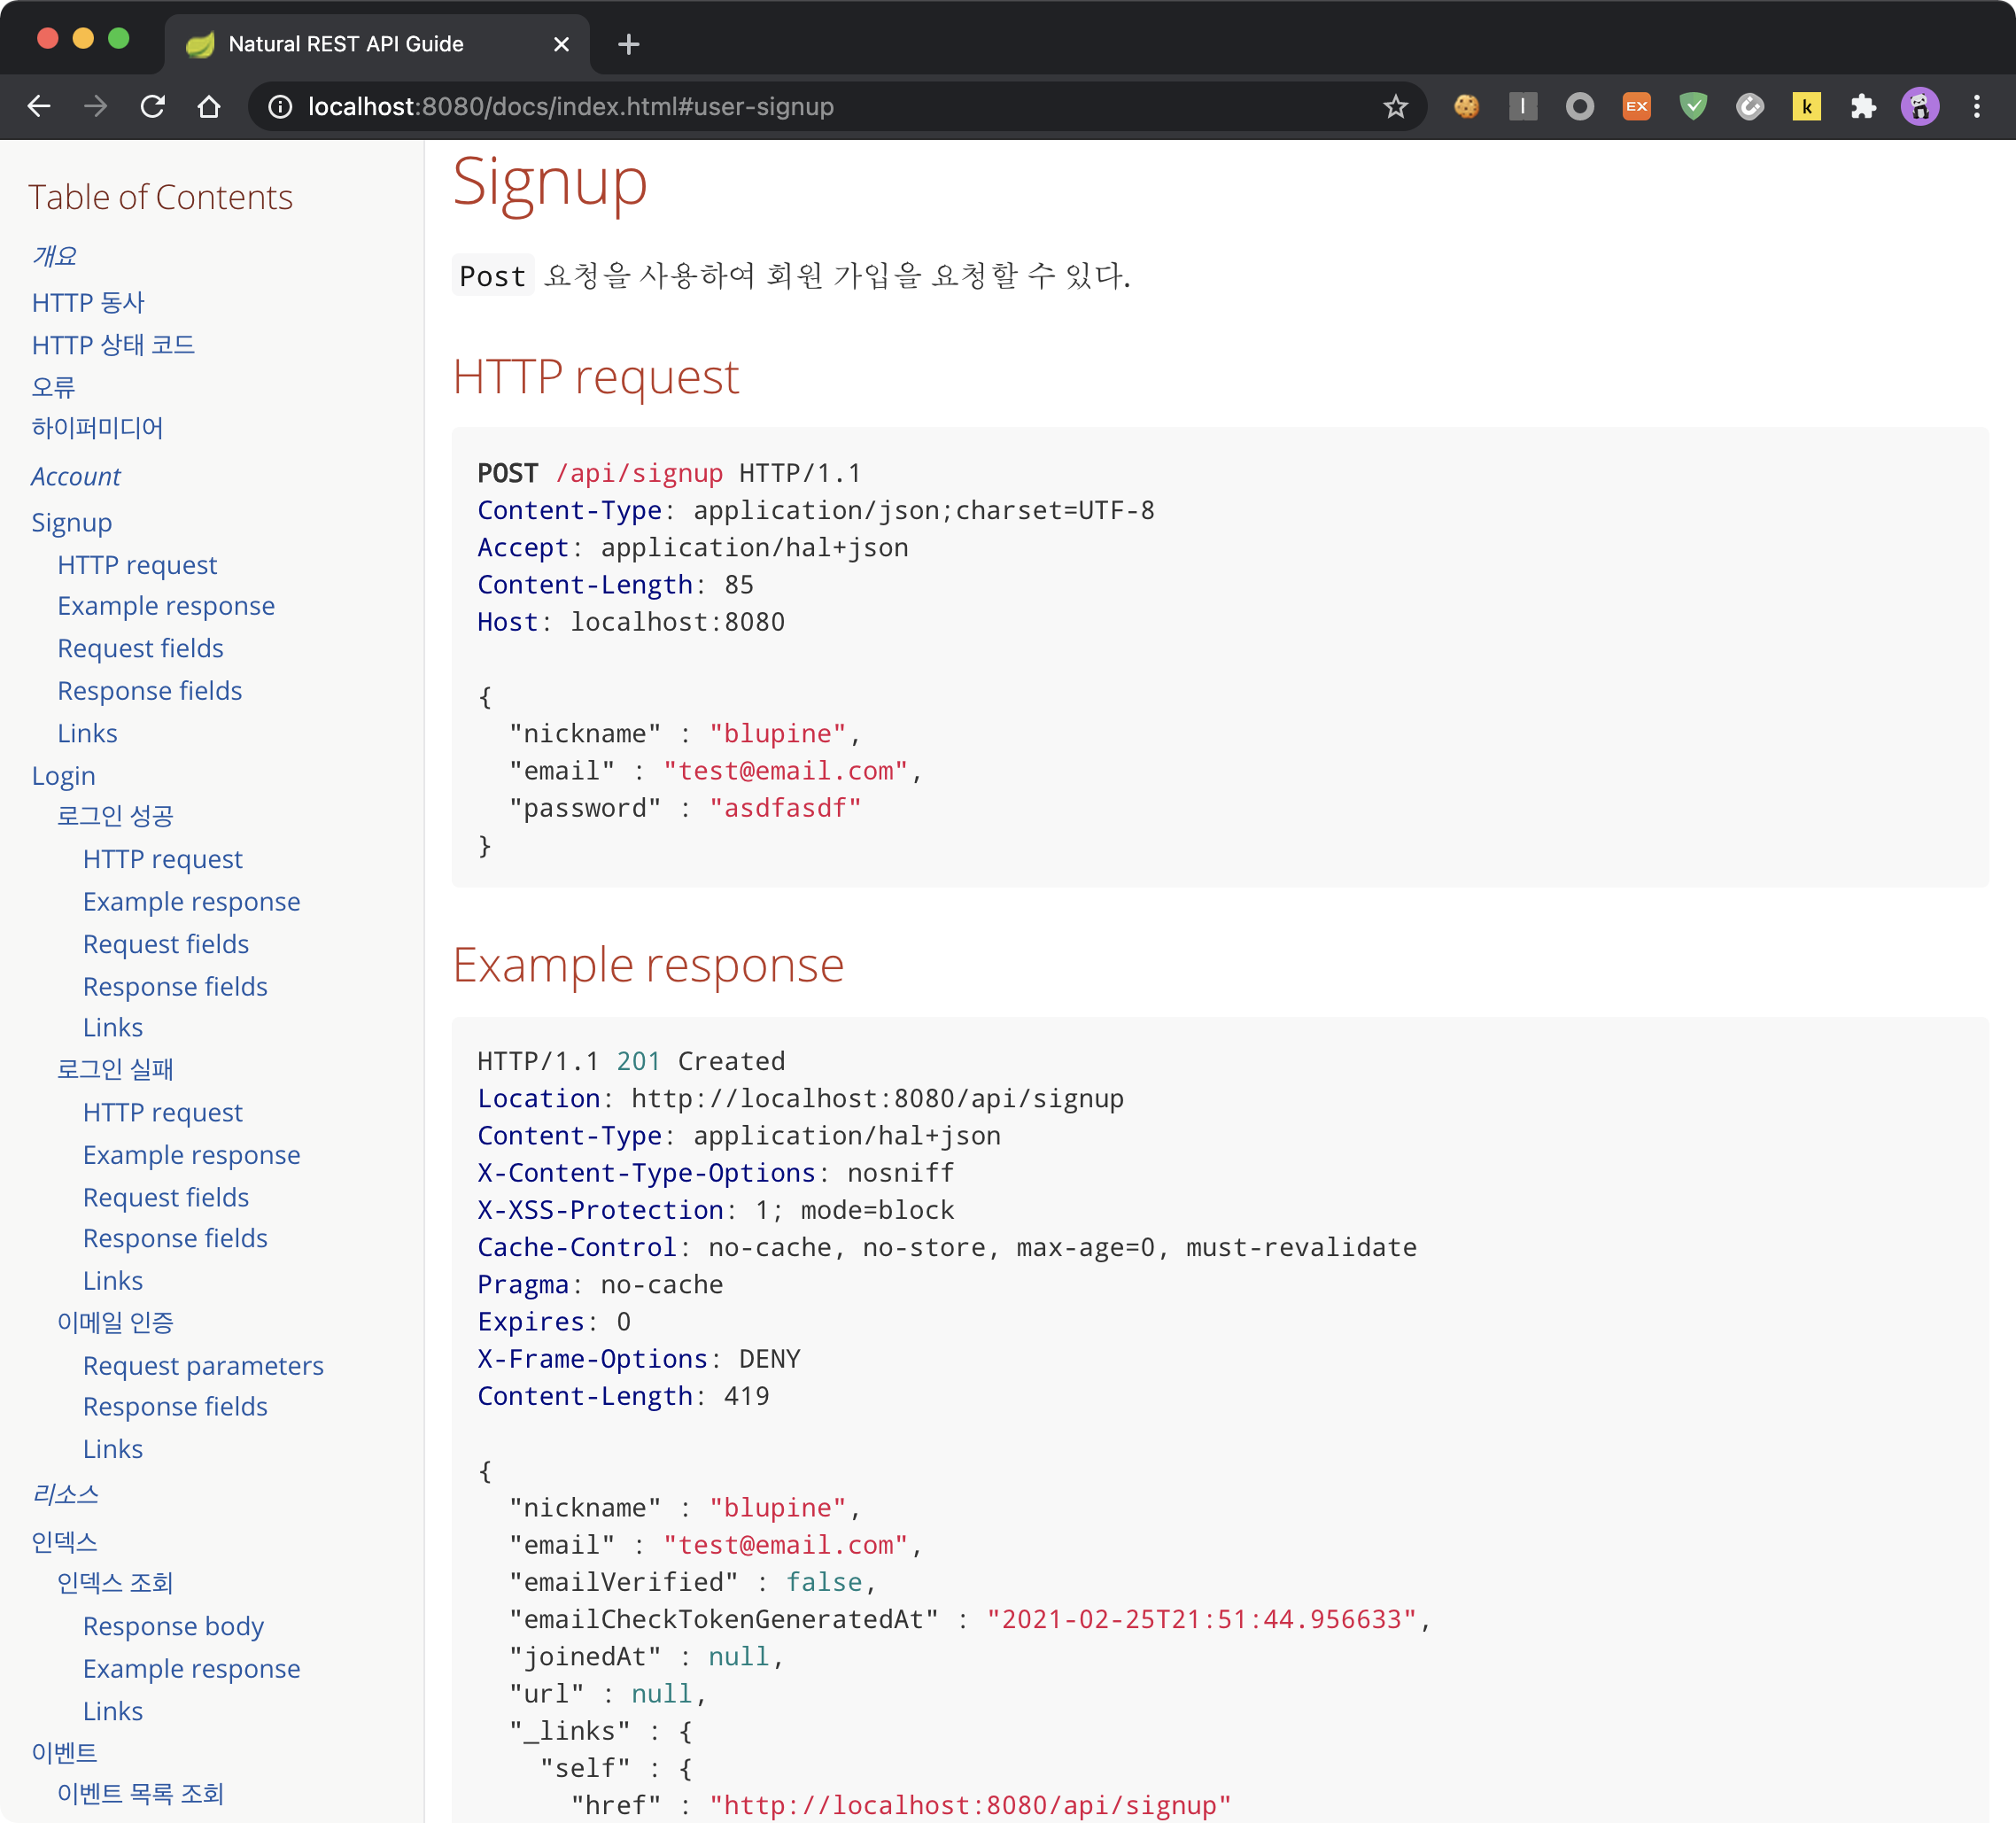
[[user-signup]]
== Signup
`Post` 요청을 사용하여 회원 가입을 요청할 수 있다.
operation::user-signup[snippets='http-request,http-response,request-fields,response-fields,links']
snippets 부분에 Docs에 포함할 snippets를 넣어주고 gradlew 빌드를 하면 해당 내용들이 포함되어서 HTML 파일이 생성된다.
$ ./gradlew build
요청 결과
{
    "nickname": "testname1",
    "email": "Test@testemail.com",
    "joinedAt": null,
    "url": null,
    "_links": {
        "self": {
            "href": "http://localhost:8080/api/signup"
        },
        "login": {
            "href": "http://localhost:8080/api/login"
        },
        "profile": {
            "href": "http://localhost:8080/docs/index.html#user-signup"
        }
    }
}
해당 링크에 접속해보면?